
10 Year Anniversary of the DDDAC1794
The chronicle of this successful DIY-Project and a suggested roadmap for upgrading
I just realized; it is already 10 years ago I designed the first version of the DDDAC1794! So, I thought it to be a good idea to write a short chronicle of the DDDAC history.
The DDDAC1794 which is still available as a DIY-Kit from Audio Creative, now in its third version, is still going strong and many hundreds if not thousands of (Analog) Audio Lovers have built (or had it done by Audio Creative) their preferred version. The latter seems to have been part of the success. In its simplest form you already have a great analog sounding DAC. There are also many ways to improve and upgrade the DDDAC. This will the second part of this posting! For in depth technical background, you can read my special (somewhat vintage) web site.
The first DDDAC1794 versions
in 2012 It all started with my wish to be able to play 176 and 192 kHz tracks. The DDDAC1543 was not able to do so. After many hours of Study and Design, I built a first prototype and with some audio friends we did blind listening tests between NOS-No Filtering and a datasheet implementation of the PCM1794. We didn’t need long. The DDDAC1794 was born!


Those days it was very hard to find appropriate USB to I2S converters, allowing the DAC to play tracks from a computer with media player software. I picked the WaveIO from Lucian. A superb design, which is still being sold today!
The mainboard of the first available DDDAC1794 version was called the “Red Board” in the audio community (for obvious reasons…)
Already a year or so later, more and more requests were coming to add SPDIF functionality. Reason was the upcoming of media player with (yes) SPDIF output (only). The DDDAC1794S saw the daylight. The mainboard got a WM8804 based SPDIF decoder embedded with a TENT XO clock option. The “Red-Board” was discontinued now. I used the opportunity to improve the mainboard with a better layout and added I2S and clock buffering to be able to stack more boards.

Even though the board above is green, for the production version I choose blue…. Till today everyone speaks of the “Blue-Board”…. For dissipation reasons, I always kept the DAC-Modules in black.

Improving further the DDDAC1794s
We move on to roughly 2016. In the meantime, the DDDAC1794S version became a beloved DIY project. And the DIY community would not be worth their name if not many did all kind of experiments. Specially with the onboard power (8 Volt) of the DAC-Modules. This made a clear improvement. Also having the PCM1794 bias current injected by current source, rather than using a simple resistor was already a big thing on the WEB.
The problem with these DIY solutions was clearly the cumbersome construction. I felt I needed to take action and designed (with the support of Guido Tent) a new DAC-Module with an embedded TENT-Shunt on board. I also added a JFET controlled current source. Which also allowed for precise adjustment of the bias current.
DDDAC1794PBT
“Powered By Tent”….. This is still the version available today. Does that mean this is the limit of what the sound result could be? Oh no! IT STARTS HERE! There are many ways to even improve the already great analog sound and I will elaborate in the second part of the post my opinions and suggestions.
Upgrade and tweaking “Guide”
To set expectations right, I will not be able to cover every possible upgrade or tweak. I probably don’t even know what is already out there, LOL. Nevertheless, I believe there is a nice roadmap of tweaks and upgrades making the basic DAC even better and better with every step you take. I will go through them one at a time in a not necessary order of improvement. I will kind of follow the logical steps you can take.

The Basic Starting Point
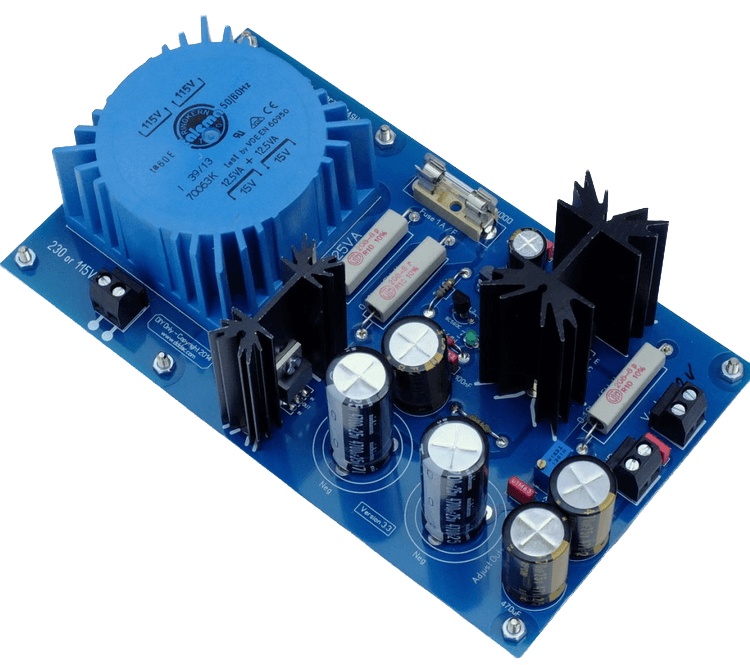
This is the what I would call the basic DAC with already HIGH-END analog sound: just a Mainboard (Blue) with one DDDAC-PBT-Module and a 12V DDDAC Power Supply
It will take any I2S or SPDIF as input. Of course, best start is using the DDDAC 12V Power Supply for the basic setup.
Here is an example of a “Basic DDDAC1794PBT” I built for a friend of mine. He is using it with a SPDIF signal coming from a vintage Sony CDP-X333ES High-End CD-Player. Well, almost (!) “Basic” as I already put “better” couple capacitors in it. But I am sure you get it… He was very enthusiastic compared to the analog output of the CD-Player it self…

Tweaking the DDDAC1794PBT
With tweaking I mean replacing components on the existing DDDAC boards to improve sound. As said, this “list” will not be complete, but it is already comprehensive and some tweaks are easy and low budget, making it an interesting and satisfying DIY undertaking. Regardless of any applied or planned upgrades, these tweaks will always improve the sound.
- Replacing the Rload resistors
- Replacing the output coupling capacitors
- Replacing the LF50 Voltage regulator on the mainboard with a high-grade version
- Replacing the LF33 on the DAC-Board
- Not tried by me: replacing the WIMA capacitors and or Electrolytes
Replacing the Rload resistors
Super easy and it always brings a small improvement. Not a big thing, but it can refine the sound a bit. My personal choice is Non-Magnetic Audio-Note resistors. But as always, that is personal preference.
Replacing the output coupling capacitors
This can be a lengthy story. Just look at the Humble Hifi Capacitor Test, LOL. Very personal of course and can cost you an arm and a leg. The result can be pretty significant though. If you are not using an output transformer, I would recommend to always do this.
Replacing the LF50 Voltage regulator on the mainboard with a high-grade version
This will clearly improve sound stage and low-level detail. Highly recommended. I tested several audiophile regulators, and they were all good. Nose length finish for me was a 5V Tentlabs Shunt. But feel free to take whatever you like. If you are using the SPDIF input seriously replacing the LF33 does a little bit as well.
Replacing the LF33 on the DAC-Board
This has been tried by several people, including me. I left space on the PCB for it. I would say, for purists only and if want the very last out of the DAC. Honestly, I could not seriously hear a difference what would matter to my (old) ears. I would recommend only do this when you have tried everything else, and you feel this last step rounds of your tweaking journey.
Not tried by me: replacing the WIMA capacitors and or Electrolytes
I am not able to seriously comment on this. I know some DIY have done this and are happy with the results. Up to you. I do believe it will make a difference, but so hard to say (or try) which ones would really make the effort worthwhile.
Upgrading the DDDAC1794PBT
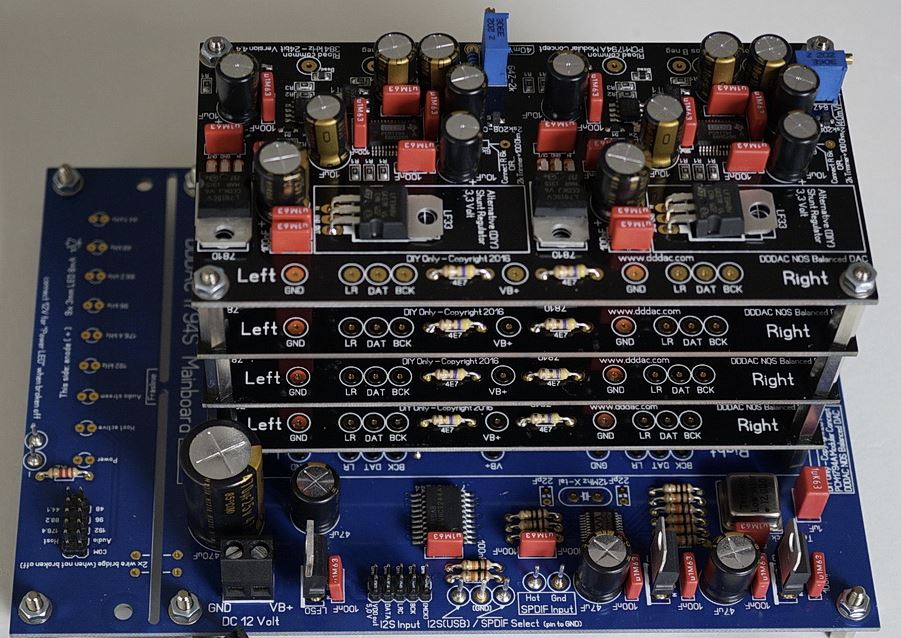
For example, below is my personal DDDAC, highly tweaked and upgraded:

With upgrading I mean adding (3rd party) modules or complete setups to improve the sound from a tweaked or un-tweaked DDDAC. Yes, both can be done totally Independent from each other. This List can be probably “endless”. Also, it can be pretty costly at some point. Having said so, if you do most of these, the DDDAC will rise to levels of unbelievable performance. The best way in my opinion, is to do every upgrade step by step, enjoying the steps of sound improvement. Ultimately, this makes more fun and is more satisfying as well.
Other than the tweaks, I would recommend following roughly the order of upgrades below:
- Adding more DAC-Modules (also called “Decks”)
- Power Supplies
- Output Transformers
- Improve the I2S signal with FiFo re-clockers
- Improved clocks for the FiFo reclocker
- Diretta streamer setup
Here is the inside of my personal DDDAC. There is probably no need to go this far, but hey, it is a nice hobby, right? If you would like to have a look at the blockdiagram of the details inside, click here.

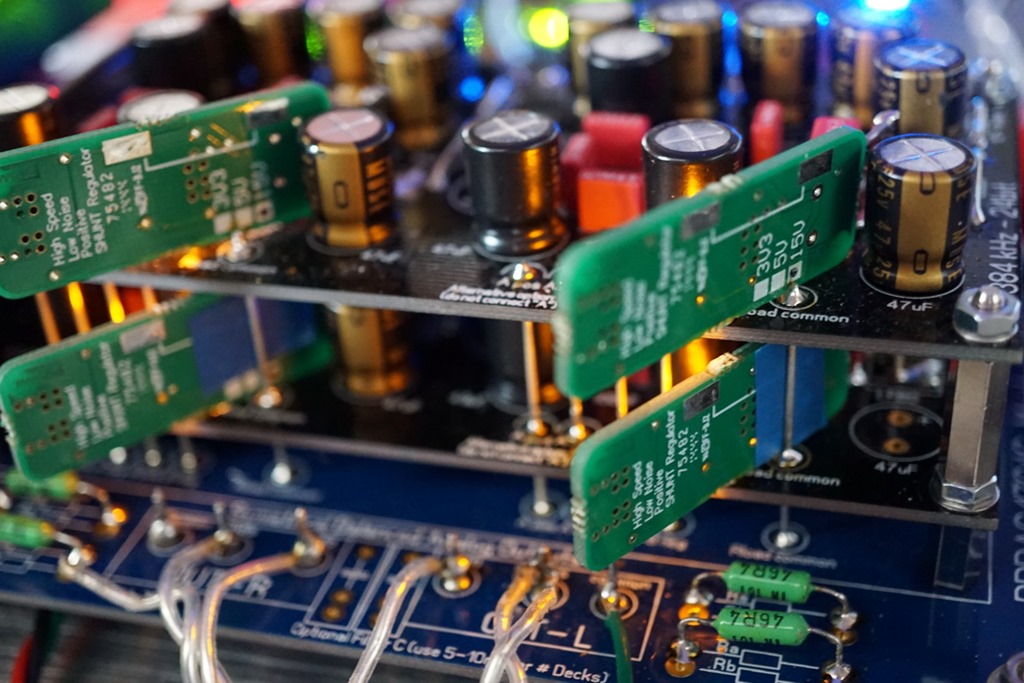
Adding more DAC-Modules (also called “Decks”)
Highly recommended. More Decks improve low level detail and add a very dynamic drive to the sound. More holistic presentation. You recognize the typical effect of what lower jitter typically does, right? Well, that is exactly what multiple decks do! Read the (original article here)
I receive this question regularly: HOW MANY decks can be stacked? Normally 2 to 4 decks give the best value (sound improvement) for money. For those who wants to experiment (yes, it is done frequently), there is a limit… above 10 decks or so it can become critical. Point is that the clock signal is getting distorted on the long wires between the decks. I found out, that by TERMINATING the BCK signal on the top board this could be avoided. The clock signal improves (less reflections) and more decks will work fine. (TESTED by me on 12 decks)

Power Supplies
This is of course generic wisdom… “Better” power supplies are always improving any audio gear. Also, it is extremely hard to find exactly that one particular PSU which does the job best. So let me throw in a few suggestions which in reallife always will improve any DDDAC System:
- Bigger transformers for the DDDAC Power supplies. Like 100-200VA toroid transformers.
- Using “heavy metal” like big CLC power supplies. The Audio Creative “Magic Power Supply” is a good example specially made for up to 8 decks (or even more)
- Use of Ultracap capacitors. There are many examples of complete solutions as well (Like from Ian Canada) – Or DIY of course. The green “Bank” in my clock project for example is an ultracap from Eaton.
Output Transformers
An output transformer does a couple of very good things for the DDDAC:
- It has a very low output impedance over the full frequency spectrum vs a capacitor.
- It has some “built-in HF-Filter” function
- It doubles (!) the amount of actual DAC outputs
- It reduces significantly the second harmonic distortion.
This leads to a more improved sound stage, very open holistic sound and a on top a strong drive and tight bass reproduction. The sound becomes cleaner and gets this improved analog flavor.
As you probably are aware of, I had a special OPT (output transformer) designed by Brian Sowter, specially for the DDDAC. There is a blog post about it you can read here.
Of course, there are many other output transformers. Experimenting is also fun. Make sure that whatever transformer you choose, it will be able to run very low frequencies at high output voltage and is not sensitive for a small amount of DC at the input.
In my personal DAC I use a special version of the Sowter which has 18 output taps with 2dB in between steps, making it a TVC. It is controlled by an Arduino and relays.
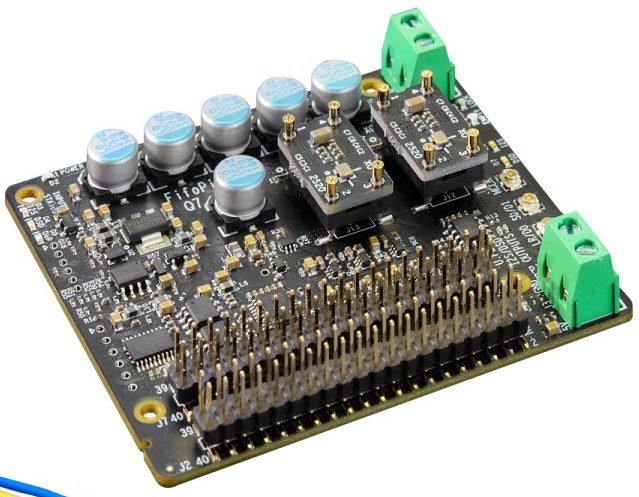
Improve the I2S signal with FiFo re-clockers
The DDDAC1794 is driven by almost any I2S source. Through the on board SPDIF or directly at the input pins header. A simple straight forward solution is for example a USB-I2S converter. Depending on the quality there will be (more or less) jitter present on the clock signal BCK. To reduce this there are a few products on the market to read the signal in memory and have it re-clocked with a local high-performance clock. Ian Canada and Andrea Mori have been kind of Avantgarde here. I have mentioned both in several posts here on my Blog Site. Or just google, you will find plenty of reading material.
Example of an Ian Canada FiFoPi:
Improved clocks for the FiFo reclocker
Assuming you are having a FiFo re-clocking device feeding the DDDAC, the next step is improving the clock doing the actual re-clocking. This is so important, i spent 6 special posts on my site for this. Easy to find, have a good read! Budgets go from a hundred Euro to a few thousand….
Below is my “clock” (system):

Others (like Diretta)
I have not tried this myself (yet), but Dick from Audio Creative spent a lot of time building all kinds of streamers. Like the Berry Streamer based on the Raspberry Pi computer and all kind of add-on boards. The latest discovery is the creation of a Roon Streamer based on the Diretta protocol. Reportedly, he and his companion Marco needed Jaw surgery, as their jaws kept dropping down, LOL.
I will not go in any further details, but rest assured, that EVERY improvement of the I2S signal, arriving at the DDDAC, having less jitter and noise, will make the DDDAC sound better.

Summary
Going through the past 10 years of the DDDAC was really fun. Suddenly I was aware again, that it all started with (YES!) a very basic DAC. This basic DAC is still today playing in the highest ranks.
For the true DIY community, thanks to the very flexible setup, it offers a great platform for almost endless experiments, tweaks and upgrades. Every year I thought, “well that’s it, we reached the summit of audio reproduction with this DAC. Unfortunately, I was wrong every single time!
It is as if we STILL have not found the limits of what the DDDAC can actually do. You might think I am likely biased as I am the original DDDAC designer? Well, I received so many nice emails and read so many positive reviews these past years, where the DDDAC1794, in various stages of tweaks and upgrades, was clearly able to play against, or win, versus commercial equipment, even way beyond the 10.000 Euro price-point. I must admit that I am quite proud of that!
The DDDAC might be 10 years old but is still rocking and thanks to the Audio Community alive and kicking with every time new ideas for tweaks or upgrades, pushing further away the limit of what this DAC is actually able to do sound-wise.
let me close with a big “thank you” for the past 10 years:
“A well-meant BIG Thanks to everyone supporting this decade’s long DIY journey by actually buying kits and that way, keeping it alive and available for the DIY-community!” – Doede
4 thoughts on “10 Year Anniversary of the DDDAC1794”
Hi there Doede,
When something that was designed a decade ago is still going strong, it all comes down to the person that broadens his horizon and came up with the idea in the first place.
Thank you very much for this fantastic dac that makes listing to music a treat every single time!
😉 Paulus
Thanks for the flowers, Paulus! I know you have been upgrading and tweaking also a lot and the result has been a significant improvement to your music listening experience.see you in Hengelo soon.
Hi Doede!
Thank you for the opportunity! I started dealing with digital audio through your DAC circuits. (around 2018) I first had success with the TDA1543, then started studying the DDDAC1794.
I changed the DAC with your subsequent permission, but this was only a personal change, I never shared it with anyone. My personal opinion is that instead of PCM1794, WM8741 is a better choice, so I redesigned my DAC to WM8740 (also DUAL mono). I still use it to this day, and it has become so good, that I dare not change, so to speak, it has become a reference piece for me. Several ears have already listened to it, and it has outperformed the of many more serious CD players, and the own my ESI maya44e sound card. During these 4-5 years, there was no reason to be ashamed, he stopped in his place to the surprise of many.
I also wandered a bit among Analog Devices’ chips, but it was worth it to hear a different sound image. I realized the difference between DAC and DAC. However, the development does not stop, thanks to those who have learned on the website. Currently, I build a shunt-fed DAC circuit with a tube buffer. Thanks again for the opportunity!
Regard:
Geri12
Hi Geri12,
Thanks for sharing your personal experience. You are right DAC is not DAC and it all stands with the implementation. I know the WM8741 chip, and it has features which did not fit in my scheme of implementation, like current output and digital filtering. I also see lots of DACs with the ESS prefix. To be honest, not sure what people like about this. The sound is very typical and, in my opinion, not “analog”. Anyway, not everyone likes steak, right?